Xamarin Forms Social Media Auth
First of all you'll need an Azure Account, you can create an account here Azure Free Account.
Open the Shell Demo Proyect in which we've worked on many labs of this blog, if you don't have it yet, you can download here.
Let's open Manage NuGet packages for Solution, search for Microsoft.Azure.Mobile.Client and download the version 4.0.2, then search for System.Net.Http and install it just in the Android Proyect.
Go to the Portable Proyect and inside the Models Folder add a new class with the name: MicrosoftData. Then replace all the content fot this:
Add another class named GoogleData and replace all the content for this code:
Add other class named FacebookData and replace all the content for this:
After that we have to make some Inheritance and Interfacing. So open App.cs from the project with Portable in the name, which is Portable Class Library project, add the following IAuthenticate interface definition immediately before the App class definition.
To initialize the interface with a platform-specific implementation, add the following static members to the App class.
That's all for the PCL proyect, let's configure the Android Environment.
Update the MainActivity class to implement the IAuthenticate interface, as follows:
Update the MainActivity class by adding a MobileServiceUser field and an Authenticate method, which is required by the IAuthenticate interface, as follows:
Update the AndroidManifest.xml file by adding the following XML inside the application element:
Add the following code to the OnCreate method of the MainActivity class before the call to LoadApplication():
This code ensures the authenticator is initialized before the app loads.
Rebuild the app.
In some cases, conflicts in the support packages displayed as just a warning in the Visual studio, but the application crashes with this exception at runtime. In this case you need to make sure that all the support packages referenced in your project have the same version. The Azure Mobile Apps NuGet package has Xamarin.Android.Support.CustomTabs dependency for Android platform, so if your project uses newer support packages you need to install this package with required version directly to avoid conflicts.
On the portable proyect inside Views folder add a new ContentPage with this name: AzureAuthPage and replace all the content for this:
Go to AzureAuthPage.xaml.cs and replace all the content for this:
Alright, almost done, we have to configure the Azure Auth Service on Azure Portal and register our application on the different developer portals (Facebook, Google, Microsoft).
Azure Configuration
Log on to the Azure portal and create a new Web App + SQL Server, by clicking on App Services then click on Add.
It must appear a screen like this one:
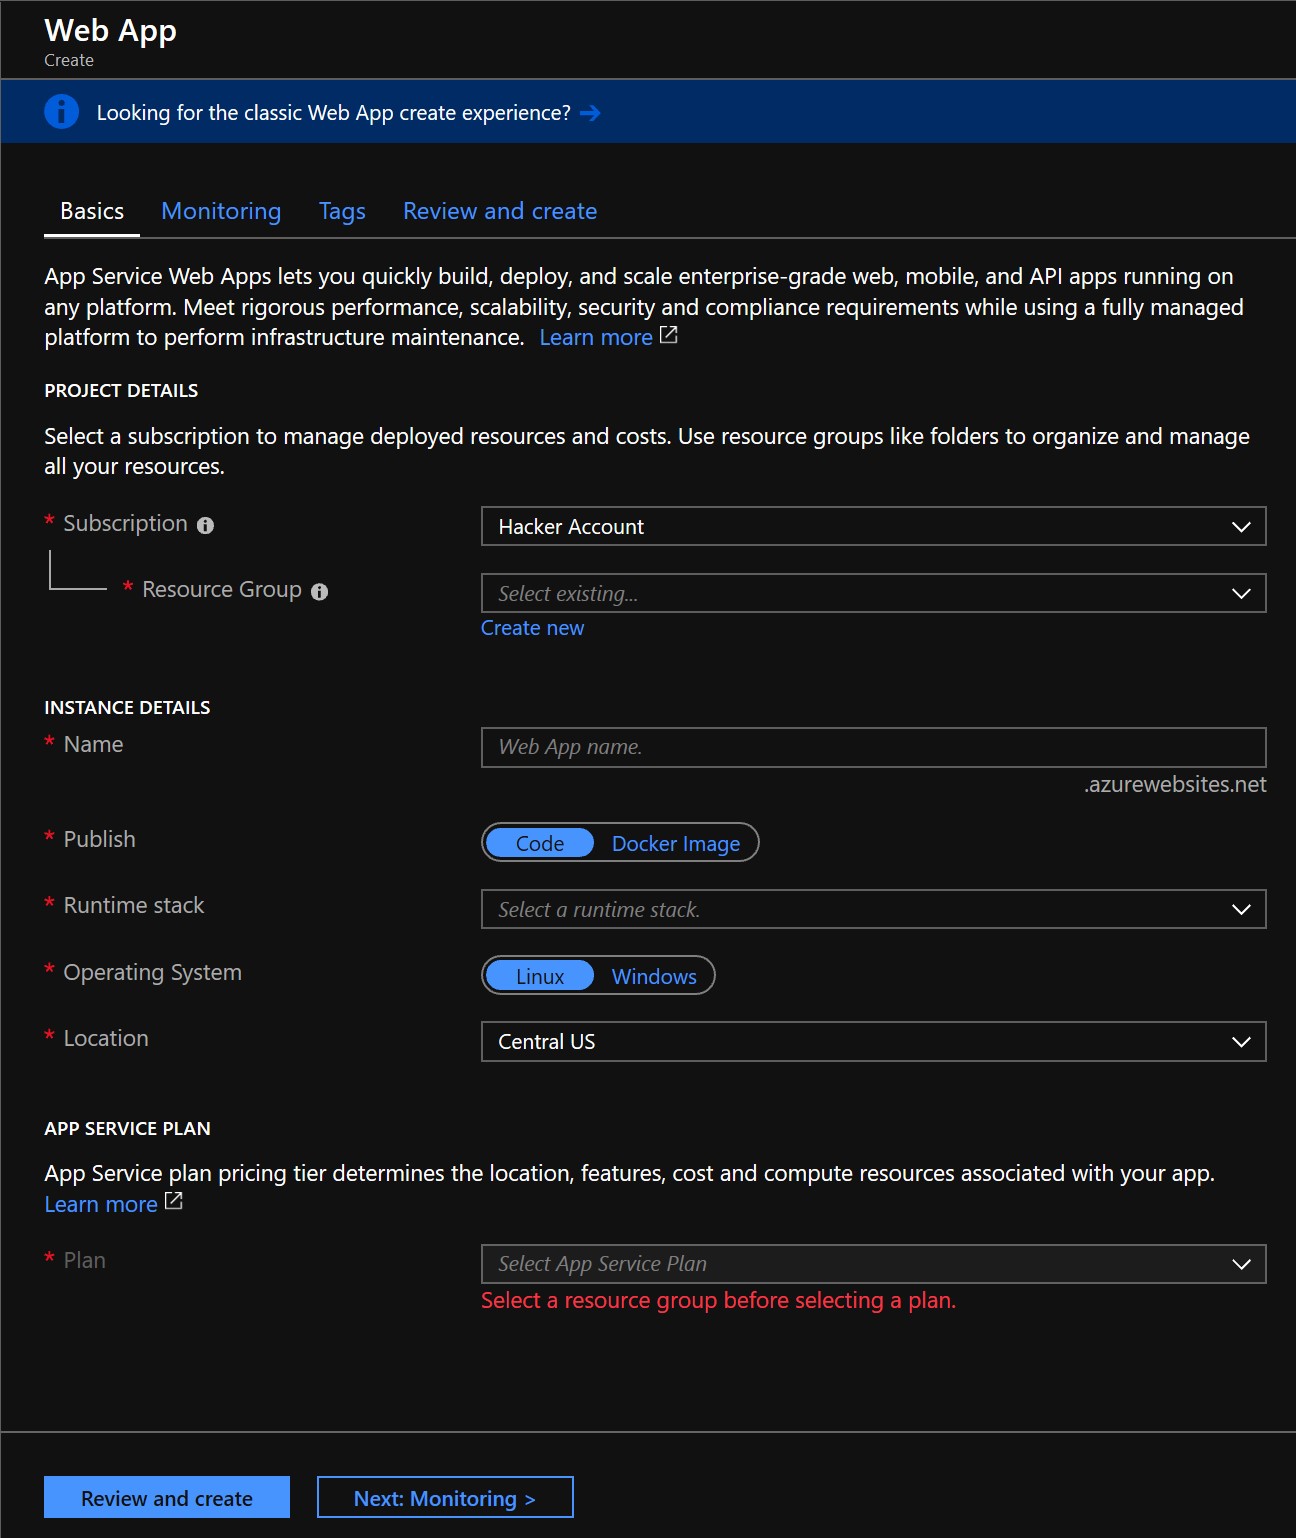
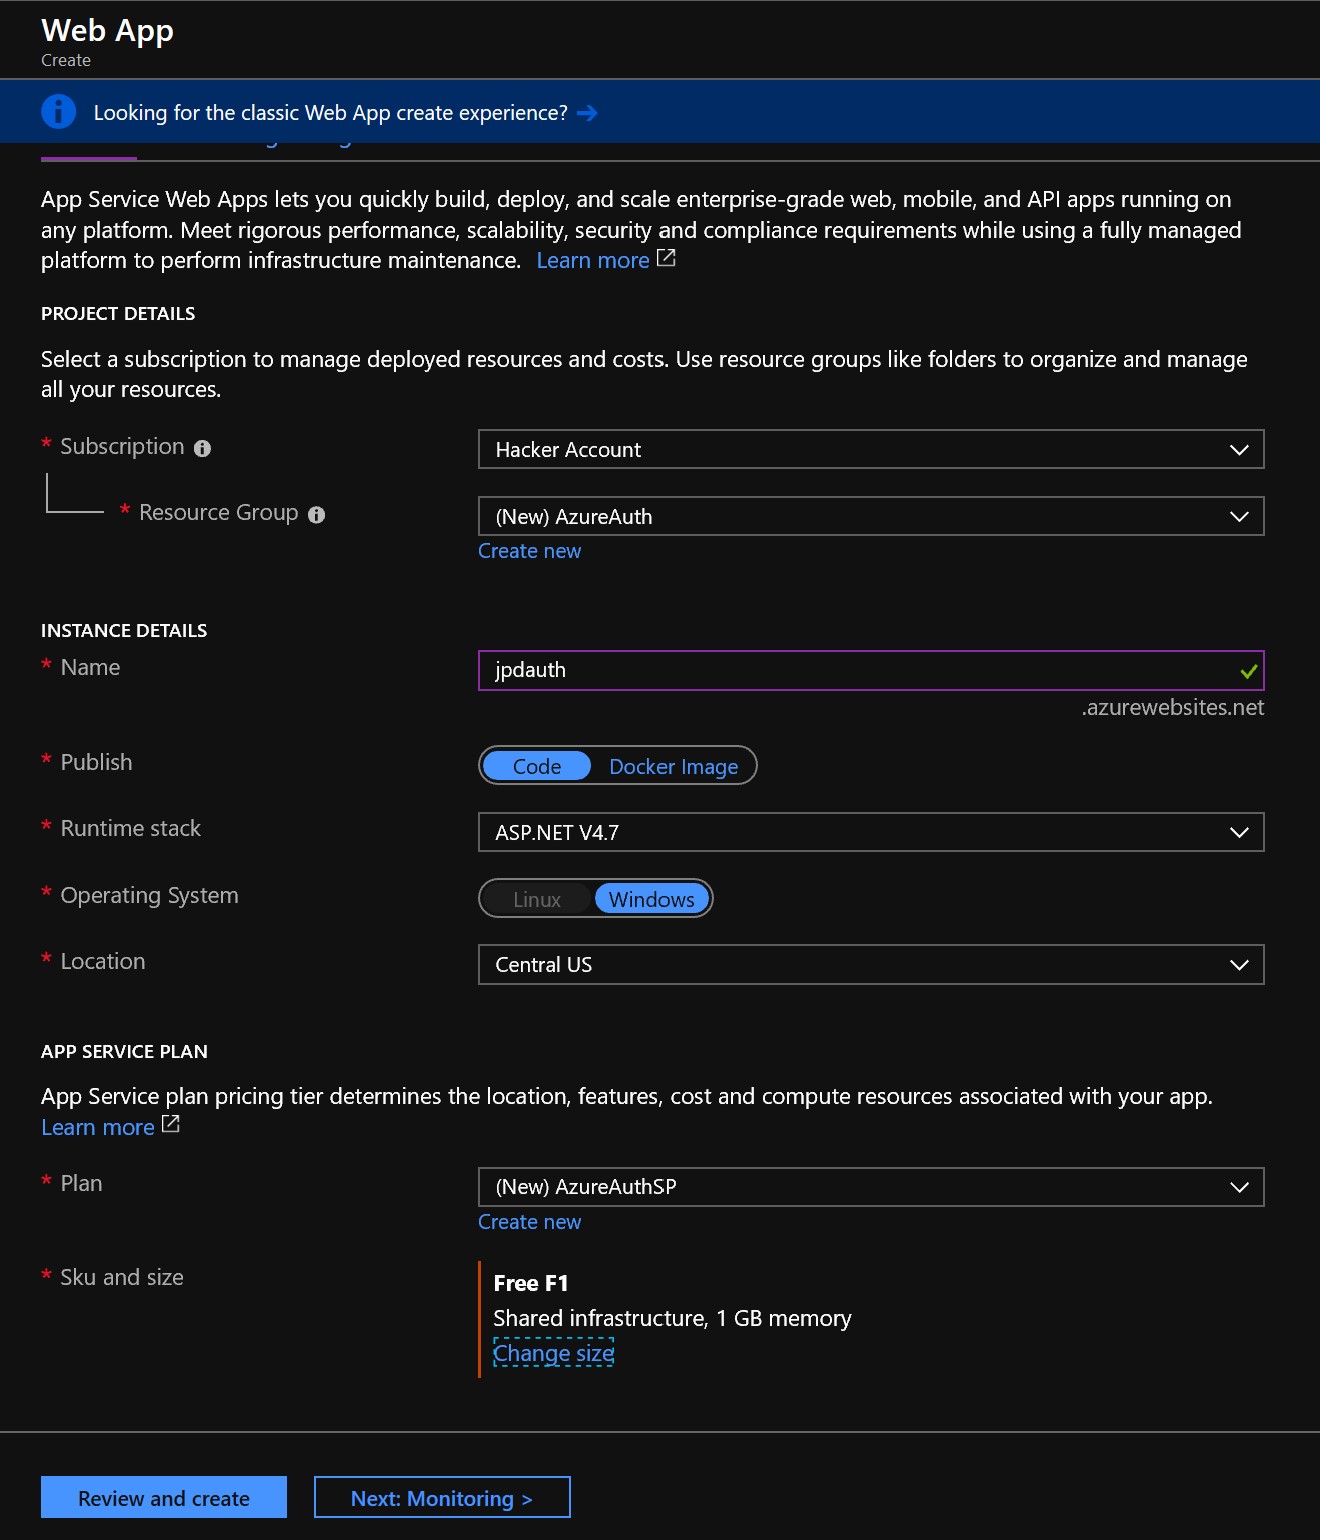
So I'm gonna fill the data as shown here:
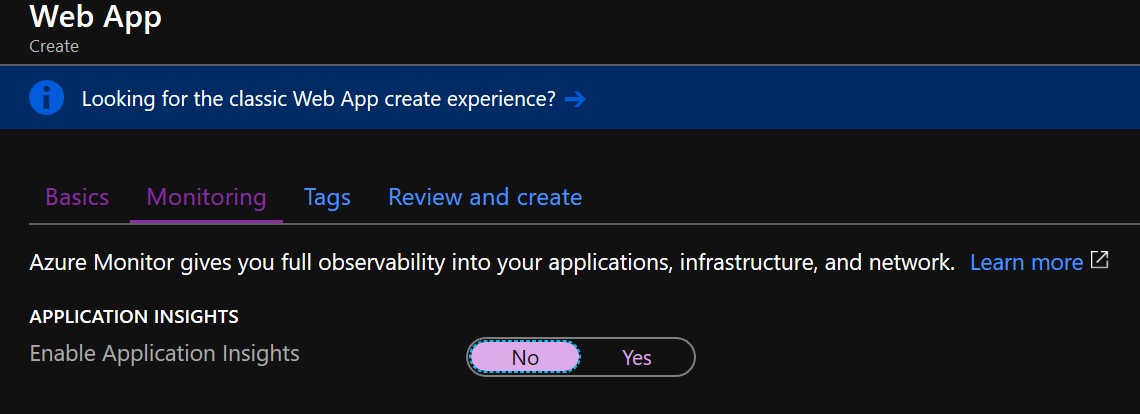
At Monitoring part, fill the data as this:
Fill the data of your database.
Click on Review And Create, so we just have to wait a few minutes, and our Web App will be created
Once the service is active it'll show a screen as next:
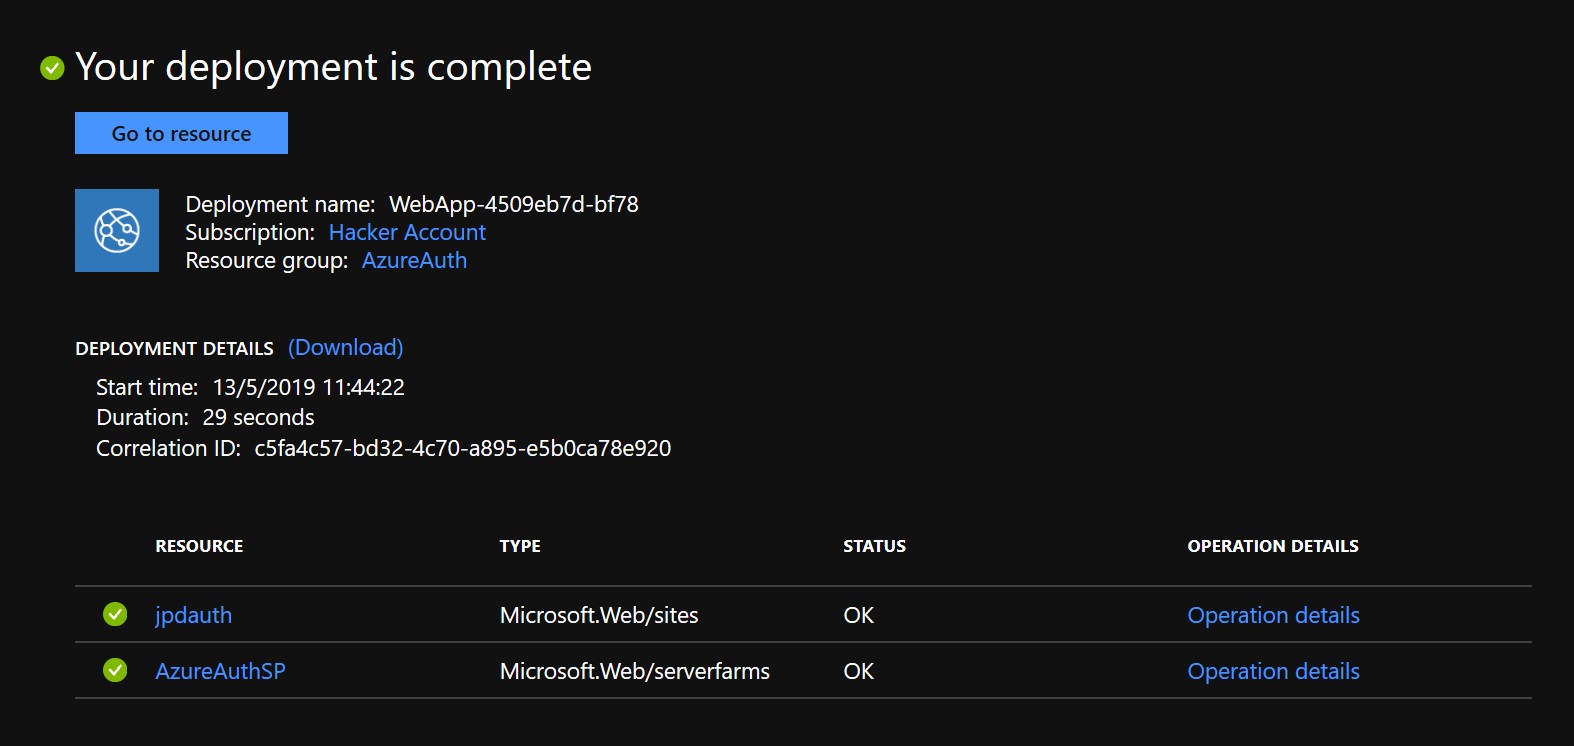
Click on jpdauth and at the left side will appear a list of configurations, click on Authentication / Authorization tag, and enable it.
Don't close the Azure Portal we're going to use it later.
Facebook Configuration
In another browser window, navigate to the Facebook Developers website and sign-in with your Facebook account credentials.
If you have not already registered, click Apps > Register as a Developer, then accept the policy and follow the registration steps.
Click My Apps > Add a New App.
In Display Name, type a unique name for your app. Also provide your Contact Email, and then click Create App ID and complete the security check. This takes you to the developer dashboard for your new Facebook app.
Under Facebook Login, click Set up, and then choose Settings in the left-hand navigation under Facebook Login.
Add your application's Redirect URI to Valid OAuth redirect URIs, then click Save Changes.
In the left-hand navigation, click Settings > Basic. On the App Secret field, click Show, provide your password if requested, then make a note of the values of App ID and App Secret. You use these later to configure your application in Azure.
Back in the Azure portal, navigate to your application. Click Settings > Authentication / Authorization, and make sure that App Service Authentication is On.
Click Facebook, paste in the App ID and App Secret values which you obtained previously, optionally enable any scopes needed by your application, then click OK.
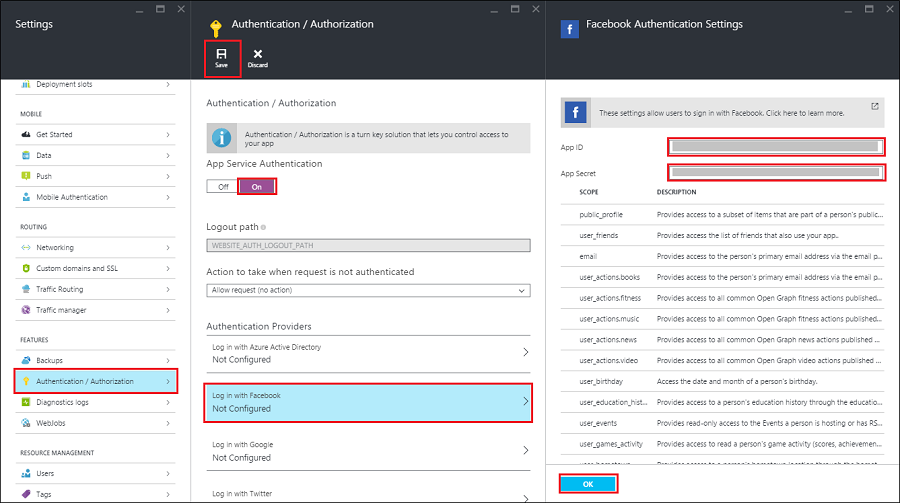
When done configuring authentication, click Save.
It's now ready to use Facebook for authentication in your app. To test it just paste this URL in the browser:
Google Configuration
Navigate to the Google apis website, sign in with your Google account credentials, click Create Project, provide a Project name, then click Create.
Once the project is created, select it. From the project dashboard, click Go to APIs overview.
Select Enable APIs and services. Search for Google+ API, and select it. Then click Enable.
In the left navigation, Credentials > OAuth consent screen, then select your Email address, enter a Product Name, and click Save.
In the Credentials tab, click Create credentials > OAuth client ID.
On the "Create client ID" screen, select Web application.
Paste the App Service URL you copied earlier into Authorized JavaScript Origins, then paste your redirect URI into Authorized Redirect URI. The redirect URI is the URL of your application appended with the path, /.auth/login/google/callback
For example:
Make sure that you are using the HTTPS scheme. Then click Create.
On the next screen, make a note of the values of the client ID and client secret.
Back in the Azure portal, navigate to your web application. Click Settings, and then Authentication / Authorization.
Click Google. Paste in the App ID and App Secret values which you obtained previously, and optionally enable any scopes your application requires. Then click OK.
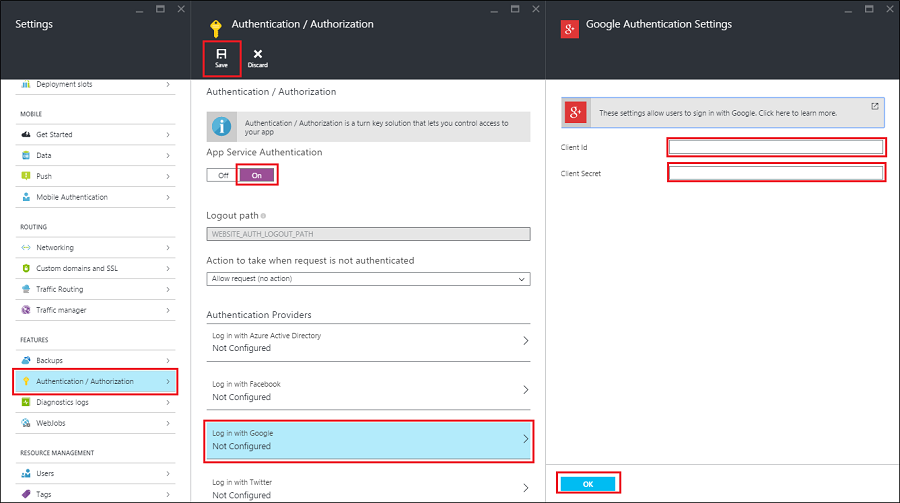
Click Save and it's now ready to use Google for authentication in your app. To test it just paste this URL in the browser:
Microsoft Configuration
Log on to the Azure portal, and navigate to your web application. Copy your URL, which later you use to configure your app with Microsoft Account.
Navigate to the My Applications page in the Microsoft Account Developer Center, and log on with your Microsoft account, if required.
Click Add an app, then type an application name, and click Create.
Make a note of the Application ID, as you will need it later.
Under "Platforms," click Add Platform and select "Web".
Under "Redirect URIs" supply the endpoint for your application, then click Save.
Under "Application Secrets," click Generate New Password. Make note of the value that appears. Once you leave the page, it will not be displayed again.
Click Save.
Back in the Azure portal, navigate to your application, click Settings > Authentication / Authorization.
Click Microsoft Account. Paste in the Application ID and Password values which you obtained previously, and optionally enable any scopes your application requires. Then click OK.
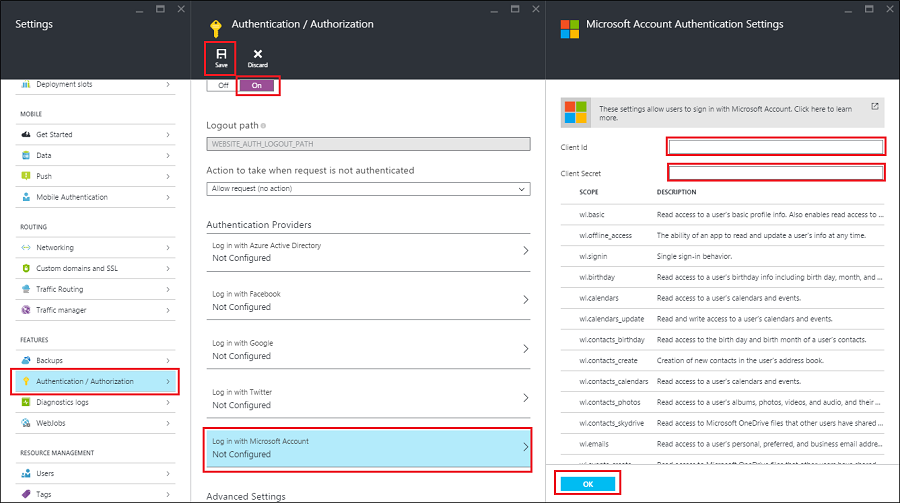
Click Save and it's now ready to use Microsoft for authentication in your app. To test it just paste this URL in the browser:
Finally at Allowed External Redirect URLs part, add a new string like this and Save.
Congratulations, you've configured all for the social media authentication.
Before testing the app, we have to change our services keys and names, for that go to ShellDemo Solution and open App.xaml.cs file. Modify the {mobile-app-url} string for your app URL, in my case is: https://jpdauth.azurewebsites.net.
Okay, only one more step, get the Authenticated User Data, if you take a look at MainActivity.cs in ShellDemo.Android proyect, you must see that there's CurrentClient.InvokeApiAsync method, with the name of UserInfo. Thats the name of our API.
Let's go back to our Azure portal and in the Web Application, at Mobile,first click on Configuration and add a New Connection String, in the name you must fill with: MS_TableConnectionString, it'll not work if you put other name... So at Value you must copy the connection string provided in the Database Configurations,then click on EASY API's. It'll enable the Easy Table Complement.
Once it's enabled, Click on Add, in name put: UserInfo and Click OK, then click on Edit Script and replace all the content of that file for this:
Press ctrl + s to save that file and that's it.
Back on our ShellDemo proyect go to App.xaml and add below this lines:
This code:
Finally go to AzureAuthPage.xaml.cs and place some breakpoints on this lines:
We're ready to test the app !!!
Related Links
Facebook Developers Portal Facebook
Google Developers Portal Google
Microsoft Developers Portal Microsoft
Azure Portal Azure
Completed Solution ShellDemo Repo
