Azure Custom Vision
In recent years, the availability of machine learning algorithms, made available as services, has transformed our ability to add artificial intelligence features to applications. Functionality that was once the remit of hardcore AI experts can now be accessed by a much wider range of developers armed with just a cloud subscription.
I’ve recently been working with one such service: the Custom Vision Service, part of the suite of Cognitive Services, provided by Microsoft and hosted at Azure.
The Cognitive Services offer several specific AI or machine learning tasks, provided as services via an API, that we can integrate into web, mobile and desktop applications, using JSON-based REST calls over HTTP or, in many cases, a higher-level client library.
Payment for the services is via a pay-as-you-go model where cost will depend on usage, with generous free tiers that can be used for experimentation, development and low-volume production requirements.
There are two services offering features related to image recognition. The first – and more established – is Computer Vision, which uses a pre-built model created and maintained by Microsoft. The Custom Vision service, currently available in preview, allows you to build and train your own model, dedicated to a given image domain.
Although there’s more work involved in sourcing images, tagging them, training and refining the model, the advantage of a dedicated one is that we’ll likely get improved accuracy when using only images from our chosen subject. This is due to the model being able to make finer distinctions between images and to avoid distractions from superficially similar but in reality quite different image subjects.
Creating a Custom Vision Service Model
To create a Custom Vision Service Model, you’ll need an Azure subscription. Sign in and, after typing “custom vision” into the search box, you’ll find a link to the service. Similar to almost all other Azure resources, you’ll be presented with a blade where you need to select the name, pricing tier, location and some other details, following which the service will be instantiated.
Pricing details can be found here. Payment is based on usage and a small amount for storage, but for investigating the service the free tier is perfectly adequate and gives access to all features, though you are limited to a single project.
The location can currently only be a single Azure region in the US, but I’d expect the service to be rolled out to more data centres as it comes out of preview, reducing latency for accessing it from websites and applications hosted in other areas of the world.
Although some aspects common with other Azure services are managed from the standard Azure portal, in most cases we work in a custom portal dedicated to the service, accessed via the “Quick start” menu.
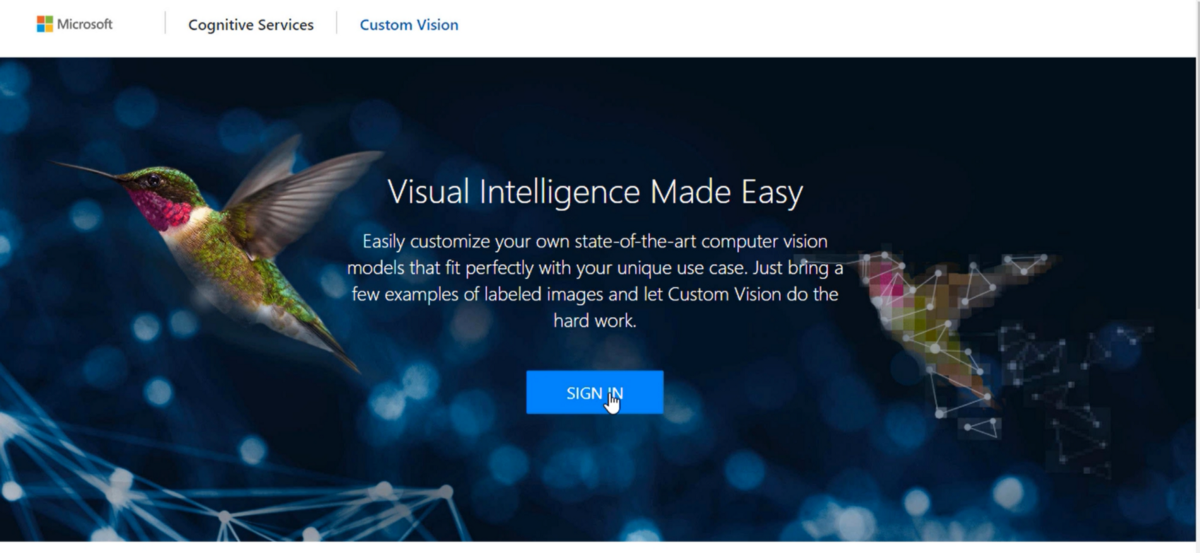
Once in this custom portal we can create a project, giving it a name, description, selecting between single and multiple subject per images options, and selecting a domain. The section here is important if you want to use the model in offline contexts, which I’ll discuss later in this article, but for now only if one of the selections (such as “landmarks” or “food”) matches our chosen subject matter should we choose anything other than “General”.
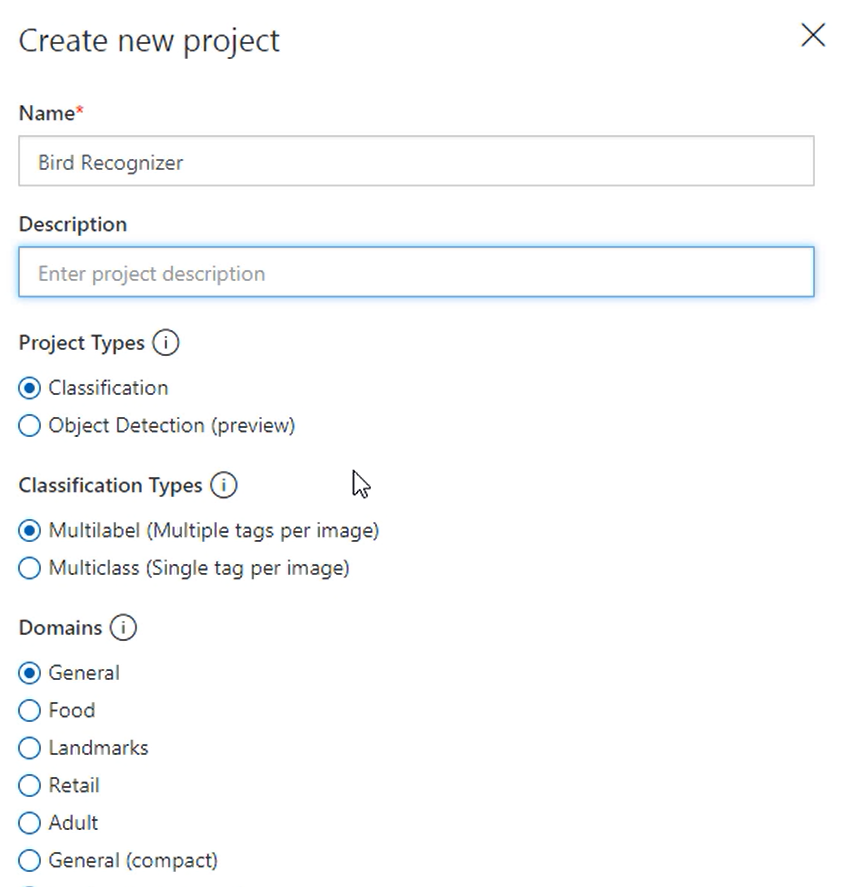
With the project created we then need to provide some pre-classified source images that we can upload via the interface and associate them with the required tag. Make sure to keep some back from the training set of images for each tag, so we have some images the model hasn’t seen directly to evaluate with.
The next step is to train the model via the green button at the top, which, once complete, will show us some statistics of the expected model performance.
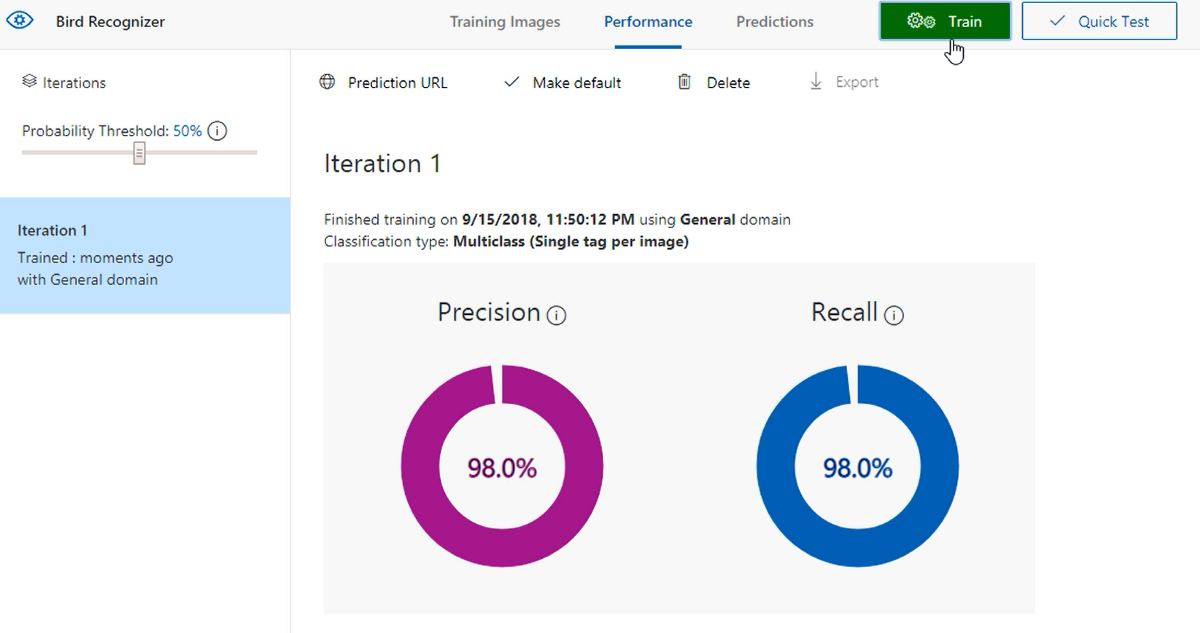
We can continue to tweak the model to look to improve these numbers by providing further images. We should aim for at least 50 in each category, with a balanced number across each, and look to provide the range of viewpoints, backgrounds and other settings in which test images may be provided when the model is in use. Each time we do this we can retrain and get a new iteration of the model with an updated set of statistics.
Integration the prediction API
Up to now we’ve interacted with the Azure portal interfaces for the purposes of creating and working with our model. While we might continue to use this method for initial training of the model, and ongoing refinement of it, the real power of the service comes from the API – known as the prediction API – that allows us to integrate it within our own applications.
Before doing that though, we need to extract three pieces of information from the portal, which we’ll need to pass for identification and authorisation purposes in the API requests. These are the project ID, the project URL and the prediction API key.
There are actually two ways to access the prediction API. The first, and only if working cross-platform, is via REST services called over HTTP, passing requests and parsing response in JSON. If on Windows, we also have the option of leaning on a client library, that abstracts away some of the underlying details of the HTTP requests and allows us to work at a higher, and more strongly-typed, level.
Although the latter is simpler, the lower-level, HTTP-based approach is also quite straightforward. The key code sample for using this is shown below:
As we’ll interact with the API by making REST calls over HTTP, first we need to create a HttpClient object.
Authorisation of access to our model is carried out by the checking of a passed header value, which we need to set before we make the request. The name of the header is Prediction-Key and the value is that which we obtained from the custom vision portal for our project. We’ve stored this in a settings file, which, within Azure function projects from which the above sample is taken, are surfaced in the form of environment variables.
Similarly, we’ve stored and can access the prediction URL end point of our model that we’re going to make our request to.
We’re using the API option where we provide the image as part of the body of our request – rather than providing a URL to the test image which is also supported – so need to convert the uploaded file from the stream we have access to, to an array of bytes, which is then wrapped within a HttpContent instance.
Having set the content type header to application/octet-stream we can then make our HTTP request using the POST method.
The response comes back as a JSON string in the example you can see, which we can deserialise into an instance of a strongly typed class we’ve also created. As well as some detail about the project and iteration used, we get back a list of predictions – one for each tag, and for each tag a probability of how confident the model is that the provided image matches the tag.
With the Windows client library, the code is a little simpler:
We’re leaning here on two NuGet packages. First Microsoft.Cognitive.CustomVision.Prediction, which is the client library itself, and then Microsoft.Rest.ClientRuntime – another library it depends on used for wrapping the REST HTTP calls.
From these, we have a model class provided, so we don’t need to create our own and ensure that it matches with the expected JSON response. We are also abstracted away from the HTTP calls, so there’s no HttpClient to work with, and need to set headers and parse responses.
Rather we just create a new endpoint object, providing the prediction key that we store in settings and is made available via an environment variable. We then make a call using the PredictImageAsync method, passing the project ID –also held in settings – and a stream representing the image file itself. We get back a strongly typed response that we can then handle as we need.
Integration the Training API
The Custom Vision Service provides a second API – known as the training API – that we can use for integrating features of building and training models into our applications. While this won’t always be useful – and we can of course continue to use the portal for such tasks – there could be cases where maintaining a model becomes part of a business process and as such makes sense to provide such features within a custom application.
We work with the training API in a similar way to that shown for the prediction API, though I’d suggest in this case, although we could use the lower-level HTTP calls, the nature of the training features mean we’ll likely be making a number of different requests to the API, and as such, would likely be wanting to create some form of wrapper to keep our code maintainable. Rather than doing that though, it makes sense to use the open-source client library that’s already available, at least if supported on the platforms you need to work with.
Working with a Custom Vision Service Model Offline
Sometimes, a real-time request over the internet isn’t feasible or appropriate – perhaps for a mobile or desktop application where network connectivity may not be permanently available. The Custom Vision Service supports scenarios like this allowing us to export the model into a file we can embed and use within our applications.
I mentioned earlier when creating a Custom Vision Service project that we had the option to select a domain. We had a choice between various high-level subject matters and also the option to select a “compact” option, and this is what we need to use for a model we want to be able export and use offline. Fortunately, we don’t have to start creating our model all over again if we’ve already created it with a standard domain; we’re able to change the domain of an existing model and then retrain it to create a new iteration using the selected domain.
Only “compact” domains can be exported, but in choosing this we do have to accept a trade-off in a small reduction in accuracy, due to some optimisations that are made to the model for the constraints of real-time classification on mobile devices.
When we export and download a model iteration, we have the choice of a number of formats, each of which are suitable for different application platforms. For example, we can select CoreML for IoS, TensorFlow for Android and Python or ONNX for Windows UWP.
Learning more
The primary reason I’ve been investigating and working with the Custom Vision Service is due to working on authoring a course for Pluralsight, where I go into the subject in a lot more detail than covered in this article, illustrate demos and sample applications, walk through code and discuss more background of image classification theory and how we can measure and refine our models.
If you have a Pluralsight subscription, or are interested in taking out a free trial, you can access the course here.
As part of working on this course I’ve released the code samples as open-source repositories on GitHub, that you can access here:
Computer Vision Service documentation:
https://azure.microsoft.com/en-us/services/cognitive-services/computer-vision/
Prediction API high-level walk-through:
https://docs.microsoft.com/en-us/azure/cognitive-services/custom-vision-service/use-prediction-api
Sample application for ONNX models exported from Custom Vision Service:
https://azure.microsoft.com/en-gb/resources/samples/cognitive-services-onnx-customvision-sample/
Image classification with WinML and UWP:
https://blog.pieeatingninjas.be/2018/05/15/image-classification-with-winml-and-uwp/
Developing Universal Windows app using WinML model exported from Custom Vision:
https://blogs.msdn.microsoft.com/bluesky/2018/07/11/developing-universal-windows-app-using-winml-model-exported-from-custom-vision-en/
Experimenting with Windows Machine Learning and Mixed Reality:
https://meulta.com/en/2018/05/18/experimenting-with-windows-machine-learning-and-mixed-reality/
Windows ML: using ONNX models on the edge:
https://en.baydachnyy.com/2018/06/06/windows-ml-using-onnx-models-on-the-edge/
Add a bit of machine learning to your Windows application thanks to WinML:
https://blogs.msdn.microsoft.com/appconsult/2018/05/23/add-a-bit-of-machine-learning-to-your-windows-application-thanks-to-winml/
Using TensorFlow and Azure to Add Image Classification to Your Android Apps:
https://blog.xamarin.com/android-apps-tensorflow https://github.com/jimbobbennett/blog-samples/tree/master/UsingTensorFlowAndAzureInAndroid
Tutorial: Run TensorFlow model in Python:
https://docs.microsoft.com/en-us/azure/cognitive-services/custom-vision-service/export-model-python
